
Creating a cloud-based IVR system using AWS Lambda - Part 1
- Posted by: Dave Collins
-
How awesome would it be to have a personal digital assistant handling your phone calls? Letting important contacts get directly to you and alerting you when others have left a voicemail? Better yet, how about if you created said assistant yourself and could control every single aspect of its behavior? In this multi-part post we are going to create a fully cloud-based assistant to handle these chores.
You would have to be living under a rock not to have heard of Amazon AWS (NASDAQ: AMZN), and you have probably heard of, if not used, Twilio (NYSE: TWLO) for SMS or IVR (Interactive Voice Response) applications. AWS is a fantastic cloud-based resource, with countless business use-cases supporting their 30+% market share of cloud computing, and Twilio is a fantastically easy-to-use IVR tool. Together AWS and Twilio are going to allow us to quickly create a powerful and flexible assistant.
In this post, we are going to build, step-by-step, a completely serverless IVR system using both Twilio and AWS. There are already several excellent tutorials available for creating a "basic" integration between Twilio and AWS Lambda (I have a few of these tutorials recommended in the notes at the end of this post). I found, though, that most of the tutorials left off a few advanced topics that are crucial for any production IVR application. The topics most typically glossed-over are Authentication and Asynchronous callback handling. In this advanced post, we are going to step-up the game with proper authentication and we are going to tackle a few nasty issues that arise when using an Asynchronous language like Node.js combined with a real-time IVR application.
We are going to setup a multi-function IVR system with the following capabilities:
I call this project "Phoebe" and she is the beginning of a personal digital assistant built completely in the cloud. I will cover all of the critical points, but will not be explaining the basics of account setup, navigation, Twilio usage, or terminology in any of these environments. Please review the "Recommended Reading" section on Github if you do not have this level of familiarity at this point.
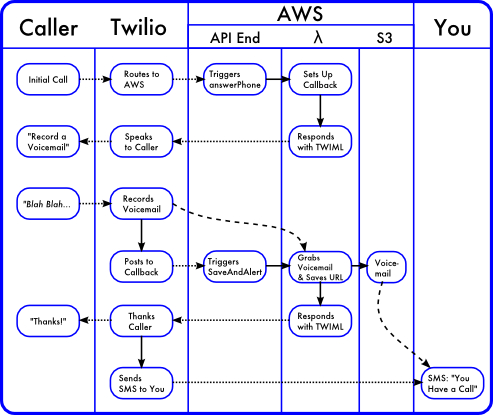
The initial goal is to end up with two Lambda functions (one to answer the phone and setup a callback, and the other to record the voicemail and send you an SMS), and a single API Gateway to control the access to the functions from Twilio. In support of those functions we also need an S3 bucket for credentials and storing voicemails, and the Twilio setup to answer and route the calls and the voicemail.
Overall, the flow will look like this:
Now, let's get to the fun part...
Setup an S3 bucket to hold configuration and voicemails
So that not any old bozo can hit our Lambda function, we want to establish some type of authentication. Luckily, Twilio's HTTP post will send your 34-character long account code as the AccountSid request parameter,
Note: Twilio docs indicate that "Twilio sends the following parameters with its request as POST parameters or URL query parameters, depending on which HTTP method you've configured". However, No matter how hard you try, the AWS API Gateway isn’t able to process POST requests that are URL encoded, so you need to modify the Twilio call to make a GET request instead of a POST (another option might be to do the parsing inside of your Lambda function)
We will need an S3 bucket with some subfolders. Choose any main bucket name you would like (I used dc-cloud-phoebe), and under that bucket create 2 folders: config and voicemails, The "config" folder will be holding the config file used for authentication, and the voicemails folder will hold the voicemails left by our callers.
On the main S3 bucket you created, ensure that the Permissions allow Your AWS Account as the Grantee and that you have full access. These should be the default settings.
Modify your local .gitignore file to have "enviornment.json" so that this file does not get into your version control
Note All of the code for this tutorial can be found in this github repository
In the config folder on S3, upload the file environment.json (sample below -- update with your values) - this will contain your credentials:
{
{
  "twilio": {
    "account_sid": "ACbf6xxxxxxxxxxxxxe1",
    "auth_token": "b6xxxxxxxxxxxxxxxxxxx217",
    "alert_phone_number": "+1765551234",
    "phoebe_number": "+17208975213"
  },
  "production": {
    "saver_script": "https://5xxxxxx.execute-api.us-east-1.amazonaws.com/prod/voicemail_saver"
  },
  "staging": {
    "saver_script": "https://5xxxxx.execute-api.us-east-1.amazonaws.com/prod/voicemail_saver"
  }
}
Initially we will only be using the values in the "twilio" key of this json. The value for "saver_script" can be left as bolerplate right now - we'll get that value later in this article after you create your lambda function.
Setup the First AWS Lambda Function (answerPhone) and an API Gateway
For our call attendant, we will need at least two functions: One function will answer the phone and prompt the caller to leave a voicemail. The other (invoked by a Twilio callback when the voicemail has been saved) will save the voicemail to our S3 bucket, let the caller know the voicemail has been saved (presuming the caller has not yet hung up), and send us two SMS messages: The first message telling us who called and another message with a hyperlink to the audio of the voicemail.
Setup your AWS Lambda functions using Node.js:
In the AWS console, choose Services | Lambda, and Create a Lambda Function. Choose "Node.js 4.3" as the runtime, and click "Twilio Blueprint"
You will be presented with a "Configure Triggers" screen, fill it out as follows, as this will help when we get to AWS API Gateway configuration later:
Configure Triggers (answerPhone Function)
DigitalAssistant
I recommend using ONE API to hold BOTH of the Lambda's we are going to create.
/answerPhone
GET
prod
AWS IAM
You will then be at a "Configure Function" screen:
Configure Function (answerPhone Function)
answerPhone
This is your Lambda name and will have to be unique across all of your Lambda's
Answers the Phone
Node.js 4.3
Edit Code Inline
Choose Code Entry Type:Edit Code Inline, and paste the following "answerPhone" code
    console.log('Loading answerPhone function');

    /* Test Configuration
        {
          "AccountSid": "YourAccountKeyHere",
          "CalledCity": "Denver",
          "CallerCity": "Evanston"
        }
    */

    var AWS = require('aws-sdk');

    exports.handler = function(event, context) {
        console.log( "event", event );
        var output = "";
        var called_city = event.CalledCity;
        var caller_city = event.CallerCity;

        var s3 = new AWS.S3();
        var auth_file = {Bucket: 'dc-cloud-phoebe', Key: 'config/environment.json'};
        s3.getObject(auth_file, function(err, auth_data) {
            if(err) {
                context.fail("Failure reading authentication file - S3 Error");
                console.log(err, err.stack);
            }
            else {
                // Parse JSON file and put it in environment variable
                var environment = JSON.parse(auth_data.Body);

                if (event.AccountSid == environment.twilio.account_sid)
                {
                    var header = '<?xml version="1.0" encoding="UTF-8"?><Response><Pause length="2"/>';
                    var greeting = '<Say voice="alice" language="en-gb">Hello, I\'m Phoebe, the Cloud-based Assistant of Dave Collins.';
                    greeting += 'Please leave a voicemail and Dave will get back to you as soon as possible.</Say>';
                    var vm_prompt = '<Record action="' + environment.staging.saver_script + '" method="GET" maxLength="20" finishOnKey="*"/>';
                    var vm_nomessage = '<Say>I did not receive a recording</Say></Response>';

                    output = header + greeting + vm_prompt + vm_nomessage;

                    context.succeed(output);
                }
                else {
                    context.fail("Authentication Failed");
                }
            }
        });
    };
Lambda Function Handler and Role (answerPhone Function)
answerPhone.handler
"Choose an existing role"
lambda_s3_exec_role
so that the Lambda can access your s3 buckets.
Advanced Settings (answerPhone Function)
We are leaving the "Advanced Settings" at their defaults
Review (answerPhone Function)
Double check the settings and click "Create Function"
Setup the Second AWS Lambda Function (saveAndAlert)
This function will be responsible for actually saving the voicemail. Since we are going to use the same API Endpoint to manage both functions, the steps are slightly different.
In the AWS console, choose Services | Lambda, and Create a Lambda Function. Choose "Node.js 4.3" as the runtime, and click "Twilio Blueprint"
You will be presented with a "Configure Triggers" screen, fill it out as follows:
Configure Triggers (saveAndAlert Function)
You will Re-use the "DigitalAssitant" API endpoint we created when we setup "answerPhone") and then click Next.
DigitalAssistant
Re-using the same API Endpoint
/saveAndAlert
GET
prod
AWS IAM
You will then be at a "Configure Function" screen:
Configure Function (saveAndAlert Function)
saveAndAlert
Saves voicemail and sends SMS
Node.js 4.3
Edit Code Inline
Choose Code Entry Type:Edit Code Inline, and paste the following "saveAndAlert" code
console.log('Loading saveAndAlert function');

/* Twilio calls this (our callback, via URL) with these parameters:
  RecordingUrl:        the URL of the recorded audio
  RecordingDuration:   the duration of the recorded audio (in seconds)
  Digits:              the key (if any) pressed to end the recording or 'hangup' if the caller hung up

  This Lambda is responsible for:
    1) Authenticating the Twilio call
    2) Gathering the Voicemail recording from Twilio and saving locally
        Twilio will return a recording in binary WAV audio format by default. To request the recording
        in MP3 format, append ".mp3" to the RecordingUrl.
    3) Sending an SMS to me so we know about the call

    Test Configuration:
    {
      "AccountSid": "YourAccountKeyHere",
      "RecordingUrl": "http://foo.com/sample_voicemail",
      "CallerName": "Test Caller"
    }

*/

var AWS         = require('aws-sdk');
var https       = require('https');
var querystring = require('querystring');


voicemailFilename = function(caller_name) {
    // Make a nice yyyy-mm-dd-hh-mm-caller_name file
    // caller_name:  "SMITH JOHN"
    var current_time = new Date();
    var filename = current_time.getFullYear().toString() + "-" +
              (current_time.getMonth()+1).toString() + "-" +
              current_time.getDate().toString() + "-" +
              current_time.getHours().toString() + "-" +
              current_time.getMinutes().toString() + "-" +
              current_time.getSeconds().toString() + "-" +
              caller_name.replace(" ","_");
    return filename;
    };


smsAlerter = function(error, message, environment, context, callback, callback_message) {
    callback = (typeof callback === 'function') ? callback : function() {};

    var postData = querystring.stringify({
      'From' : environment.twilio.phoebe_number,
      'To'   : environment.twilio.alert_phone_number,
      'Body' : message
    });
    console.log("(smsAlerter) message:" + message);

    // See https://nodejs.org/dist/latest-v4.x/docs/api/https.html#https_https_request_options_callback
    var options = {
        hostname: 'api.twilio.com',
        method: 'POST',
        path: '/2010-04-01/Accounts/' + environment.twilio.account_sid + '/Messages.json',
        headers: {
            'Content-Type': 'application/x-www-form-urlencoded',
            'Content-Length': postData.length
        },
        auth: environment.twilio.account_sid + ':' + environment.twilio.auth_token
    };
    console.log("(smsAlerter) options.path:" + options.path);

    var request = https.request(options, function (response) {
      console.log('(smsAlerter) STATUS: ' + response.statusCode);
      response.setEncoding('utf8');
      response.on('data', function (chunk) {
        console.log('(smsAlerter) response data event');
      });
      response.on('end', function () {
        console.log('(smsAlerter) response end event. Calling callback');
        callback(null, callback_message, environment, context);
      });
      response.on('error', function (error) {
        console.log('(smsAlerter) response Error received: ' + error);
      });
    });
    request.on('error', function (e) {
      console.log('(smsAlerter) problem with request: ' + e.message);
    });
    request.write(postData);
    request.end();
    console.log("(smsAlerter) Have ended the request");
};


twimlCallback = function(error, message, environment, context) {
    var twimlHeader       = '<?xml version="1.0" encoding="UTF-8"?>';
    var responseHeader    = '<Response>';
    var responseFooter    = '</Response>';
    var sayHeader         = '<Say voice="alice" language="en-gb">';
    var sayFooter         = '</Say>';
    var smsHeader         = '<Sms from="' + environment.twilio.phoebe_number + '" to="' + environment.twilio.alert_phone_number + '">';
    var smsFooter         = '</Sms>';

    if (error) {
        console.log('(twimlCallback) ERROR');
    }
    else {
        console.log('(twimlCallback) returning success and twiml');
        var full_callback_message = twimlHeader + responseHeader + sayHeader + message + sayFooter + responseFooter;
        context.succeed(full_callback_message);
    }
};


exports.handler = function(event, context) {
    console.log( "event", event );
    var recording_url           = event.RecordingUrl;
    var caller_name             = event.CallerName;

    console.log("(handler) recording_url:" + recording_url);

    var s3 = new AWS.S3();
    var param = {Bucket: 'dc-cloud-phoebe', Key: 'config/environment.json'};
    s3.getObject(param, function(err, auth_data) {
        if(err) {
            context.fail("Failure reading authentication file - S3 Error");
            console.log(err, err.stack);
        }
        else {
            console.log("(handler) Parsing Environment file");
            var environment = JSON.parse(auth_data.Body);
            if (event.AccountSid == environment.twilio.account_sid)
            {
                var voicemail_file = {Bucket: 'dc-cloud-phoebe/voicemails', Key: voicemailFilename(caller_name), Body: recording_url};
                var sms_notice = 'Saving voicemail';
                var recording_notice = 'Recording URL';

                console.log("(handler) Starting s3 Upload: " + caller_name);
                s3.upload(voicemail_file, function(err, voicemail_data) {
                    if (err) {
                        console.log("(handler) S3 ERROR:" + err, err.stack);
                        var bummer = 'So sorry, I had trouble saving the voicemail';
                        sms_notice = 'Error saving voicemail from ' + caller_name;
                        smsAlerter(null, sms_notice, environment, twimlCallback(null, bummer, environment, context));
                    }
                    else {
                        console.log('(handler) Uploaded file:' + voicemail_data);
                        var inform_voicemail_sent = 'I have sent your voicemail to Dave. Bye!';

                        // We send TWO text messages in case the message containing URL causes issues on the receiving phone
                        sms_notice = 'Call from ' + caller_name;
                        recording_notice = 'URI: ' + recording_url;
                        console.log('(handler) Defining smsCallDetails');

                        var formatTwimlResponse = function(err, message, environment, context) {
                            console.log("(smsCallDetails) Calling twimlCallback to render final Twiml");
                            twimlCallback(err, message, environment, context);
                        };

                        var smsCallDetails = function(err, message, environment, context) {
                            console.log("(smsCallDetails) Calling smsAlerter with recording_notice");
                            smsAlerter(null, recording_notice, environment, context, formatTwimlResponse, inform_voicemail_sent);
                        };

                        console.log('(handler) Calling smsAlerter with sms_notice');
                        smsAlerter(null, sms_notice, environment, context, smsCallDetails, null);
                    }
                });
            }
            else {
                context.fail("(handler) Authentication Failed");
            }
        }
    });
}
Lambda Function Handler and Role (saveAndAlert Function)
saveAndAlert.handler
"Choose an existing role"
lambda_s3_exec_role
so that the Lambda can access your s3 buckets.
Advanced Settings (saveAndAlert Function)
We are leaving the "Advanced Settings" at their defaults
Review (saveAndAlert Function)
Double check the settings and click "Create Function"
Test your Lambdas Prior to setting up the API Endpoint
Testing and troubleshooting when using Lambda, the API Gateway, and Twilio is made much, much easier if you test each component individually before trying to integrate the pieces (sound familiar?). First let's test the answerPhone function.
Testing the answerPhone Lambda
Go back to the Lambda main screen, click on your "answerPhone" function, and under Actions choose "Test Function". You will be brought to an "Input test event" screen. Paste the following code (which is also setup as a comment block in the answerPhone function), and Modify the "AccountSid" to be the same Twilio Sid you put in your environments.json file:
{
  "AccountSid": "PlaceyourTwilioSidhere",
  "CalledCity": "Denver",
  "CallerCity": "Chicago"
}
For this test the AccountSid is the only thing that really matters. Click "Save and Test" You will see "executing function" and then, if your Lambda ran without errors, you will see "Execution Result: succeeded" and the output. Your Lambda function output should be "Twiml" (an XML variant) and should look something like this:
"<?xml version=\"1.0\" encoding=\"UTF-8\"?><Response><Pause length=\"2\"/><Say voice=\"alice\" language=\"en-gb\">
Hello, I'm Phoebe, the Cloud-based Assistant of Dave Collins.
Please leave a voicemail and Dave will get back to you as soon as possible.
</Say><Record action=\"https://5....a.execute-api.us-east-1.amazonaws.com/prod/voicemail_saver\"
method=\"GET\" maxLength=\"20\" finishOnKey=\"*\"/><Say>I did not receive a recording</Say></Response>"
If you don't get that successful response, check the "Log Output" section. Some common problems at this point are:
Remember, at this point you are not using the API gateway, nor are you using Twilio. You are just verifying that your Node.js Lambda function is running without errors. This might be a good time to mention our unit tests. If you view the github repository for this project, you will see that we have some Mocha tests for the Node.js. Unfortunately, "I suck at Mocha" (Sorry - Most of my testing is done in Rspec for rails) so the tests are very basic. Please log a Pull Request on the project if you can improve the tests!
Testing the saveAndAlert Lambda
Similar to the answerPhone testing steps above, but you'll need a different JSON structure. This is the callback method that Twilio will be calling. Twilio will provide the all-important "RecordingUrl" and "CallerName" parameters that this method will be using.
{
  "AccountSid": "YourTwilioAccountSid",
  "RecordingUrl": "http://foo.com/sample_voicemail",
  "CallerName": "Test Caller"
}
Just as with the answerPhone lambda, all you are looking for here is basic success and a TWIML response.
When each test is successful, choose Actions | Publish New Version
Setup the API Gateway
Now we are getting to the fun part! We need to properly expose our two Lambdas as Externally acessible API's using AWS API Endpoint
Warning!Many of these screens look very similar to each other and differ only by a word in the title. Please proceed slowly and double-check that you are on the correct screen.
Setup the API Gateway for the answerPhone Lambda
Let's map our answerPhone Lambda function to an external API Endpoint, so that Twilio can hit our Lambda function when somebody calls us.
Choose Services | Amazon API Gateway and under API's you should see the DigitalAssistant we created when we setup the first (answerPhone) Lambda. Click on your DigitalAssistant API and then "resources".
If all went well, you should have two resources here: "answerPhone" and "saveAndAlert". I have had times during testing where one or more of the resources did not get automatically added, and some times where a "null" resource showed up. No big deal: If you see a "null" resource just click on it and choose Actions | Delete Resource.
If one or more of your resources are missing, just choose Actions | Create Resource , select type "GET" and click the save (checkmark) icon... Then follow the instructions below for each resource.
Since you linked answerPhone first you'll probably see the answerPhone resource here, we will need to modify several components of this resource:
Click on your answerPhone GET handler to pull up the Resource diagram. There are four sections that we need to visit to double-check settings: "Method Request", "Integration Request", "Integration Response", and "Method Response"
Method Request (answerPhone)
Authorization: None, API Key Required: False
You need three: Under "Name" add AccountSid. Also add CalledCity and CallerCity
Nothing
Nothing
Integration Request (answerPhone)
Under "Body Mapping Templates", Since Twilio will be sending us a GET request with parameters, and we are expecting JSON in our Node.js Lambda's, ensure your settings are as follows:
Lambda Function
(your region)
answerPhone
Note: If you have properly defined your function, you should get auto-suggest here.
Add a Mapping Template if application/json is not there
                    {
                      "AccountSid" : "$input.params('AccountSid')",
                      "CalledCity" : "$input.params('CalledCity')",
                      "CallerCity" : "$input.params('CallerCity')"
                    }
Click Save and move on to Integration Response
Integration Response (answerPhone)
Under the "200" Method Response Status, "Body Mapping Templates", you may already have a Mapping Template with the content-type of "application/x-www-form-urlencoded" This needs to be changed. When you are finished we want only one Body Mapping Template:
ensure your settings are as follows: - Content-Type: application/json - In the main body, enter the text below
    #set($inputRoot = $input.path('$'))
    $inputRoot
Method Response (answerPhone)
Twilio needs and expects to receive TWIML (SML) back from us, not JSON (I'm eagerly awaiting Twilio supporting JSON responses instead of this XML variant). In the meantime, we need to setup Response Models for 200
- Response Models for 200: Add "application/xml" and model: Empty
Setup the API Gateway for the saveAndAlert Lambda
If this resource is missing, just choose Actions | Create Resource, type "saveAndAlert" and click the save (checkmark) icon.
Make sure the saveAndAlert resource has a "GET" method: Click Actions | Create Method, choose GET and click the save (checkbox) icon.
Path: /saveAndAlert
Now highlight it and create a GET method
/saveAndAlert - GET - Setup
Lambda Function
(your region)
saveAndAlert
Note: If you have properly defined your function, you should get auto-suggest here.
click Save, and OK the new permission to get to the resource diagram
Click on your saveAndAlert GET handler to pull up the Resource diagram. There are four sections that we need to visit to double-check settings: "Method Request", "Integration Request", "Integration Response", and "Method Response"
Method Request (saveAndAlert)
Authorization: None, API Key Required: False
under "Name" Add AccountSid. Also add RecordingUrl and CallerName
No headers
No models
Integration Request (SaveAndAlert)
Under "Body Mapping Templates", we need to setup a mapping template Since Twilio will be sending us a GET request, and we are expecting JSON in our Node.js Lambda's, ensure your settings are as follows:
Lambda Function
(your region)
saveAndAlert
Note: If you have properly defined your function, you should get auto-suggest here.
Add a Mapping Template if application/json is not there
                    {
                      "AccountSid" : "$input.params('AccountSid')",
                      "RecordingUrl" : "$input.params('RecordingUrl')",
                      "CallerName" : "$input.params('CallerName')"
                    }
Integration Response (SaveAndAlert)
There should already be a row for the HTTP 200 response status. Under "Body Mapping Templates" for a 200 (OK) Method Response Status, you may already have a Mapping Template with the content-type of "application/x-www-form-urlencoded" This needs to be changed:
ensure your settings are as follows: - Lambda Error Regex: .* - Content-Type: application/json - In the main body, enter the text below:
#set($inputRoot = $input.path('$'))
$inputRoot
Method Response (SaveAndAlert)
Twilio needs and expects to receive TWIML (XML) back from us, not JSON (I'm eagerly awaiting Twilio supporting JSON responses instead of this XML variant). In the meantime, we need to setup Response Models for 200
- Response Models for 200: Add "application/xml" and model: Empty
if there is one for application/json, delete it.
OK at this point you should have a DigitalAssistant API Gateway with two resources each having a GET method. Let's test the API Gateway settings to be sure they are working before we get to configuring Twilio.
Test your API Endpoint from within the API Gateway
Testing the answerPhone API Gateway Endpoint
After you have saved your settings in the sections above, click the Test ("Lightning Bolt") icon to bring up a test page. Here you will need to fill in the three Query Strings we setup in Method Request | Query String Parameters (AccountSid, CalledCity, and CallerCity). AccountSid is the only one that is important right now. If you want the test to succeed, make sure that the AccountSid you enter actually matches the AccountSid in your S3 bucket environments.json file!
If your test succeeds, you should see a Status 200 (HTTP OK), and a Response Body that is TWIML... This is what will be read by Twilio and result in your digital assistant speaking your message to the caller:
    <?xml version="1.0" encoding="UTF-8"?>
    <Response>
      <Pause length="2"/>
      <Say voice="alice" language="en-gb">Hello, I'm Phoebe, the Cloud-based Assistant of Dave Collins.
      Please leave a voicemail and Dave will get back to you as soon as possible.
      </Say>
      <Record action="https://5oxxxxka.execute-api.us-east-1.amazonaws.com/prod/voicemail_saver"
      method="GET" maxLength="20" finishOnKey="*"/><Say>I did not receive a recording
      </Say>
    </Response>
It is also very important that your "Response Headers" are {"Content-Type":"application/xml"}
If your test fails, double-check the application/json blocks you entered in both Integration Request and Integration Response. If you get an "Authorization Failed" message it probably simply means that the Twilio Account ID you entered during the test phase does not match what you have on your S3 bucket.
When your test succeeds, choose Actions | Deploy API.
Copy and past the "Invoke URL" as this is what you will set along with your API method name in Twilio for calling your new Lambda. If you ever forget this URL, you can go to "Stages" under your API, find your method call, and click on it to see this "Invoke URL" again.
Testing the saveAndAlert API Gateway Endpoint
Test saveAndAlert at this point as well
Update your Environment.json file
Now that you have deployed your API, you can (and must) update the environment.json file we uploaded to S3 in step 1. The answerPhone function uses environment.staging.saver_script to send Twilio the callback lambda name. We didn't know the name of that function (since the API endpoint had not yet been created) when we first uploaded the file.
Find your copy of environment.json and change both saver_script lines to reference your newly created and deployed API endpoint:
"saver_script": "https://5...h.execute-api.us-east-1.amazonaws.com/prod/saveAndAlert"
After updating your file, upload it to your S3 bucket - overwriting the first file you uploaded.
Configure Your Twilio number to call your API Endpoint
The basics of using the Twilio dashboard are pretty straightforward. (Note that I am using the Twiml "Console Beta" as of writing this blog post). You will need to purchase a Twilio number, then go to the Phone Numbers | Manage Numbers screen to route the calls to your Lambda. Make the following changes to your phone number:
Voice
Webhooks/TwiML (used to be "URL")
Webhook: (Paste the URL from your Amazon Endpoint Here, and add the method name) : HTTP GET
Example: https://9...b.execute-api.us-east-1.amazonaws.com/prod/answerPhone
Remember, AWS Lambda does not parse URL parameters coming from a POST
Enabled
The rest of the settings can be left alone for now. Save these changes
Now, call your number from a phone! Did it work? Congratulations! But, in all likelihood, it probably won't work the first time. Here is how we troubleshoot this multi-layered environment.
Troubleshooting
If you hear a voice saying "We're sorry, an application error has occurred" - this usually means that Twilio got something back that it couldn't parse (e.g. not TWIML), or an HTTP failure. A quick look in the Twilio logs will show you the issue:
Go to the Twilio Dashboard Programmable voice | Logs and you should see the most recent log in red. Click on it to view the Request Inspector. In one case I saw that Twilio got an HTTP 403 (Forbidden) response... This made me think authentication. Back to the Amazon API Gateway!
Looking at the Raw Twilio request, I saw that it was sending the parameter AccountSid (note the case), and that looks correct...
Checking back I realized I forgot to add the API Method name in Twilio (it just ended at /prod). Added that back.
Then got an error 12300 Invalid Content Type... I saw that Twilio got the application/json back, but it needs TWIML... Back to the API Endpoint configuration. Fix that then re-test!
Success!
Testing from CURL
If you continue to have trouble testing while calling from a phone, it will probably make sense to take both the phone and Twilio out of the equation, then use curl to setup the call that Twilio will make to your endpoint - then you have immediate feedback and don't have to go digging through twilio logs.
Here is an example curl (you will have to use your AccountSid) that mimics what Twiml sends to AWS when you call your properly-configured number:
curl -v \
-X GET \
--get \
-d CallerCity=Minneapolis \
-d AccountSid=123123123 \
-d CalledCity=Denver \
https://5oxxxxa.execute-api.us-east-1.amazonaws.com/prod/answerphone
(Note that I haven't passed all of the URL parameters here - just the ones we needed). When this works, you will see something like this:
  ...
  * About to connect() to 5oxxxxa.execute-api.us-east-1.amazonaws.com port 443 (#0)
  *   Trying 52.84.213.71...
  * Connected to 5oxxxxa.execute-api.us-east-1.amazonaws.com (52.84.213.71) port 443 (#0)
  ... Cert Key Exchange Info ...

  GET /prod/phoebehello?CallerCity=Minneapolis&AccountSid=123123123&CalledCity=Denver HTTP/1.1
    User-Agent: curl/7.30.0
    Host: 5oxxxxxa.execute-api.us-east-1.amazonaws.com
    Accept:

  < HTTP/1.1 200 OK
  < Date: Thu, 26 May 2016 02:53:52 GMT
  < Content-Type: application/xml
  < Content-Length: 433
  ...
  <
  * Connection #0 to host 5oxxxxka.execute-api.us-east-1.amazonaws.com left intact
  <?xml version="1.0" encoding="UTF-8"?><Response><Pause length="2"/><Say voice="alice" language="en-gb">
  Hello, I'm Phoebe, the Cloud-based Assistant of Dave Collins.
  Please leave a voicemail and Dave will get back to you as soon as possible.
  </Say>
  <Record action="https://5xxxxxa.execute-api.us-east-1.amazonaws.com/prod/saveAndAlert"
  method="GET" maxLength="20" finishOnKey="*"/>
  <Say>I did not receive a recording</Say></Response>
The key things you need to see are an HTTP 200 OK response code and the TWIML xml that will instruct Twilio how to read back information to your caller.
A common mistake is leaving the API Endpoint Get - Method Request : Authorization Setting set to Authorization: AWS_IAM. It must be Authorization: NONE because we are exposing this publicly. If you get this wrong you will see the following error when using the CURL technique:
{"message":"Missing Authentication Token"}
Remember to click the little "save checkboxes" and to re-deploy your API any time you make changes
Finis
At this point you should have a working Voice attendant that is answering your calls, recording a voicemail, and sending you text messages with the caller information and a playable hyperlink to the voicemail! I hope you had a lot of fun, learned a ton, and enjoy using your new digital assistant!
In Part 2 we will import your Google Contacts into a DynamoDb and then modify Phoebe to "patch through" important callers directly to your phone, while others hear a voiceamil.